Before Traveling How to Guide Network File Sharing & Network Discovery Disabled
To turn off file sharing, you'll just need to make a quick change in Network and Sharing Center (Windows 10) or Settings (Windows 11). It's just as easy to turn off internet connection sharing, as well as disabling your mobile hotspot if you're sharing your connection over Wi-Fi.
How to Disable Network Sharing on Windows
On Windows 11, go to Settings > Network & internet > Advanced network settings > Advanced sharing settings. Select your network, then toggle off “File and printer sharing.” On Windows 10, go to Control Panel > Network and Internet > Network and Sharing Center > Change advanced sharing settings.
Method1
Turn Off File Sharing (Windows 10)
1.Open the Control Panel. To stop sharing files with other people on your network, you can disable file and printer sharing in Control Panel. To open Control Panel:
- Press Windows key + S.
- Type control panel.
- Click Control Panel in
the search results.
2. Click Network
and Internet. If you don't see this option, click the
menu at the top-right and select Category. You'll see it then.
3.Click Network
and Sharing Center.
4.Click Change advanced sharing settings. It's the third link from the top of the
left column.
5.Click the network profile that says “(current profile)” at the end. This ensures that you're changing the sharing settings for your current connection. You'll see “(current profile)” next to one of the following options:
- Private: This is for your private connections, such as when you're on your home network.
- Guest or Public: When you're connected to Wi-Fi in a public location, whether or not you have to enter a Wi-Fi password to log in.
- All Networks: Both public and private networks.
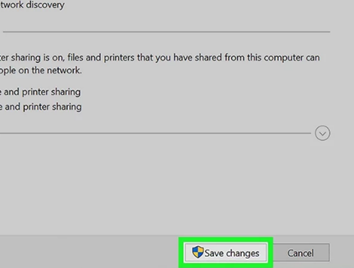
7.Click Save
changes. It's the button at the bottom of the
screen. You have disabled file sharing for the current connection.
7.Click Save changes. It's the button at the bottom of the screen. You have disabled file sharing for the current connection.
Method2
Turn Off File
Sharing (Windows 11)
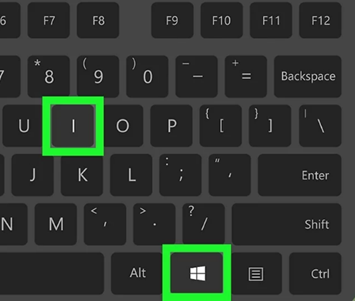
1.Open your
Windows Settings. You can do this quickly by pressing Windows
key + I, or by clicking the Settings gear
in your Start menu.
1.Open your Windows Settings. You can do this quickly by pressing Windows key + I, or by clicking the Settings gear in your Start menu.
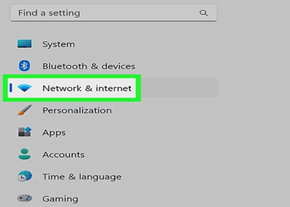
2.Click Network & internet. You'll see this in the left panel.
3.Click Advanced network settings. It's the last option in the right panel.
4.Click Advanced sharing settings. This option is in the "More settings" section below the list of network adapters.
5.Select a network profile. The profile you're using now will be selected by default. If you want to turn off network file sharing for the current connection, just skip to the next step. Otherwise, you can enable or disable file sharing for Private networks (such as on your home network), Public networks (at school or in a café), or All networks.
6.Toggle off "File and printer sharing"
. Once the switch turns gray or white, you'll no longer be sharing files or your network printer with other devices on your network.
- If you don't want other devices on the network to be able to see your PC, you can also click the switch next to "Network discovery" to disable it.
Method3
Turn Off
Internet Connection Sharing (Windows 10 & 11)
1.Open the Control Panel. This method will teach you how to stop sharing your PC's network connection with other users. To open Control Panel:
- Press Windows key + S.
- Type control panel.
- Click Control Panel in the search results.
- If you're using Windows 11, you should
only use this method if you're sharing your internet connection using an ethernet cable. If you're
sharing your connection over Wi-Fi, see this method instead.
3.Click Network and Sharing Center.
7.Uncheck “Allow other network users to connect through this computer's internet connection.” Clicking the box once should remove the check mark.
- If the box was already empty, you don't
need to make any changes.
8.Click OK. It's
at the bottom of the dialog window. Now that you've turned off connection
sharing, nobody else on your network can connect to the internet through this
computer's connection.
Related Articles
step-by-step guide to help you set up and manage multiple email accounts in Outlook
Prepared by: Paresh Parmar Version: 1.0 Effective Date: June 3, 2024 Managing multiple email boxes in Outlook can help you stay organized and efficient. Here's a step-by-step guide to help you set up and manage multiple email accounts in Outlook: ...A GUIDE TO Bitwarden Change KD Iterations Settings.
Prepared by: Paresh Parmar Version: 1.0 Effective Date: July 5, 2024 Bitwarden showing KDF Settings. Changing KDF iterations As mentioned above, Bitwarden uses a secure default. However, you can change the iteration count from the web vault's ...Bitwarden User MFA Enable step by step guide.
Prepared by: Paresh Parmar Version: 1.0 Effective Date: August 27, 2023 Bitwarden User MFA Enable step by step guide. Bitwarden User MFA Login Step by Step Guide. Two-step Login via Authenticator apps, such as Google Authenticator, do not ...Folder Sharing Through One Drive.
Create Folder on Desktop then Right Click on Folder which needs to share with specific users. Click on One Drive and Share. Provide user details who needs to share folder with specific rights with Edi or View. Copy Link or click to send users. They ...PATeam Wallpaper Setup Guide Step-by-Step Installation & Configuration
PART 1: INSTALLATION FROM COMPANY PORTAL Step 1: Open Company Portal Click the Start Menu (Windows icon) in the bottom left corner Type: Company Portal in the search box Press Enter or click the Company Portal application ✓ Company Portal app opens ✓ ...